Incoming Calls
Incoming Calls tools let you manage incoming call rules and routes via two tabs: DID Routes, the default; and Caller ID Rules. A DID Route maps numbers coming in on a particular Provider or Channel Group to a particular extension., and Incoming Call ID Rules let you perform actions on calls based on who is calling you. These rules are system wide and happen before any of the extensions' call rules are triggered.
DID Routes Tab
By default, Switchvox creates a DID route (the callback extension) for each interface as they are created (i.e., each provider has a rule). You can add new rules that allow for specialized routing based on information sent by the provider or deduced from the channel group.
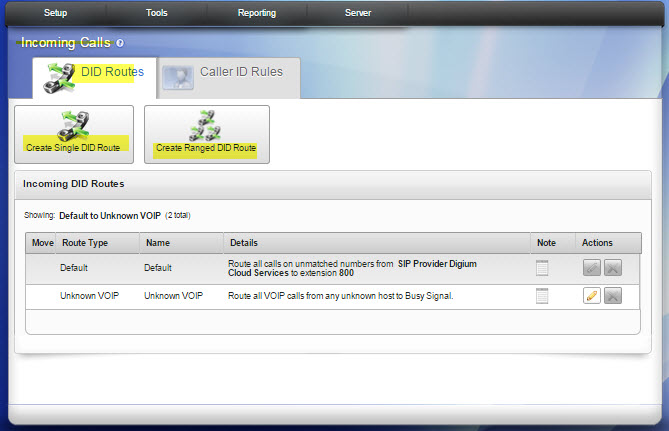
To create a new DID route, click Create Single DID Route or Create Ranged DID Route. A Single DID Route always routes calls to a single, specific extension. A Ranged DID Route derives the correct extension number from the DID.
You can put all of the DID Routes in order, to ensure that call reach the correct extension.
NOTE: Some SIP providers and most types of analog lines do not send the number dialed to the PBX. Ask your phone service provider if they support multiple incoming numbers or DIDs.
Single DID Route Settings
This option lets you send a single phone number to a specific extension. For example:
Route number 8005551212 on numbers from Channel Group T1 to extension 802
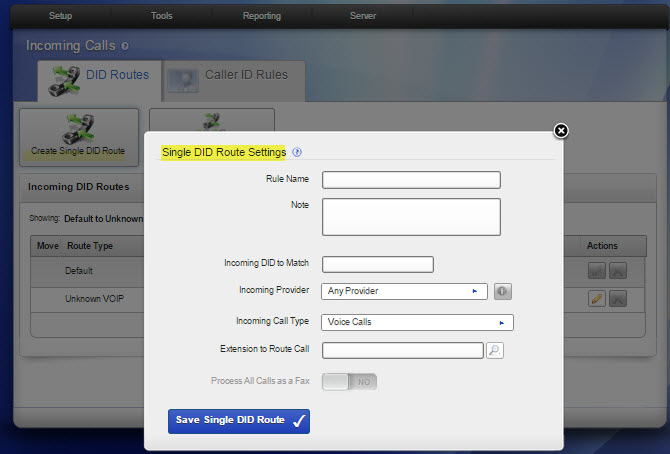
To create a single DID route, enter/specify the following information:
- Rule Name to identify the rule.
- Note. Clarifying information regarding the rule.
- Incoming DID to Match.
- Incoming Provider. Select provider from the list of existing Providers.
- Incoming Call Type. Select from dropdown options: Voice Calls, Faxes, or both.
- Extension to Route Call. Search for or enter the extension to route.
- Process All Calls as a Fax. If you have fax capabilities, and you have selected both types of calls, you call indicate YES; otherwise, this option is not available.
NOTE: You must install a fax license and the fax software to make faxing available.
For details, see “Digium Addon Products.” When finished, click Save Single DID Route.
Ranged DID Route Settings
This option lets you send a range of phone numbers to an extension that is derived from the phone number itself. This is useful if each person has an outside number for directly dialing their extension. For example: All Voice Calls on numbers from Channel Group T1 ranging from 8005551200 through 8005551300 will route to an extension derived by trimming 7 digits from the front and adding 0 to the result.

Enter the following information:
- Rule Name to identify the rule.
- Note. Clarifying information regarding the rule.
- Beginning Range of Incoming Call. First number in the range of numbers.
- End Range of Incoming Call. Last number in the range of numbers.
- Incoming Call Type.Type of calls to affect: Voice Calls, Faxes, or Voice Calls and Faxes.
- Incoming Provider. Select provider from the list of existing Providers.
- Number of digits to trim. Enter the number of digits to trim from the front of the phone number.
- Derive Resulting Extension by adding this to the trimmed call. Enter a value to add to the result or you can leave this blank.
Caller ID Rules Tab
To create a new Incoming Caller ID Rule, click either Create Call Transfer Rule or Create Block Number Rule.
Create Transfer Call Rule
This option lets you create a rule that transfers certain callers to a specific extension For example, you could route all calls from a vendor whose phone number is 8005554321 to the extension for your purchasing department.
NOTE: All phone numbers used in an incoming call rule must be exactly as they appear in your caller ID. This number is usually the full 10-digit number, which includes the area code.
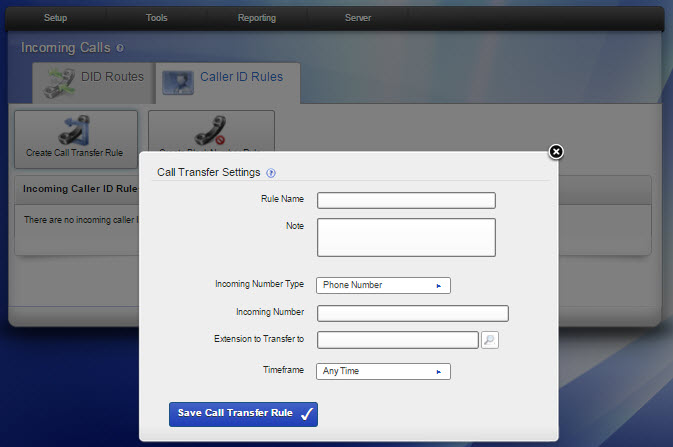
To create a new incoming call rule, enter/select the following information:
- Rule Name to identify the rule.
- Note. Clarifying information regarding the rule.
- Incoming Number Type from the dropdown. Options are Phone Numer or Prefix.
- Incoming Number. Enter the phone number or prefix that you want to affect.
- Extension to Transfer to. Enter the extension the call should be transferred to.
- Timeframe. Select Any Time, During Business Hours, Outside Business Hours, or Weekends Only from the dropdown. (For more information, see “Time Frames.")
When finished, click Save Call Transfer Rule and a message is displayed indicating the new rule was successfully saved.
Create Block Number Rule
This option lets you block callers from certain phone numbers or prefixes. For example, a rogue fax machine keeps calling your office with a caller ID number of 8005551234. You could add a Block Number incoming call rule that hangs up anytime this number calls you. You can block whole prefixes of numbers by choosing to block Prefix rather than Phone Number.
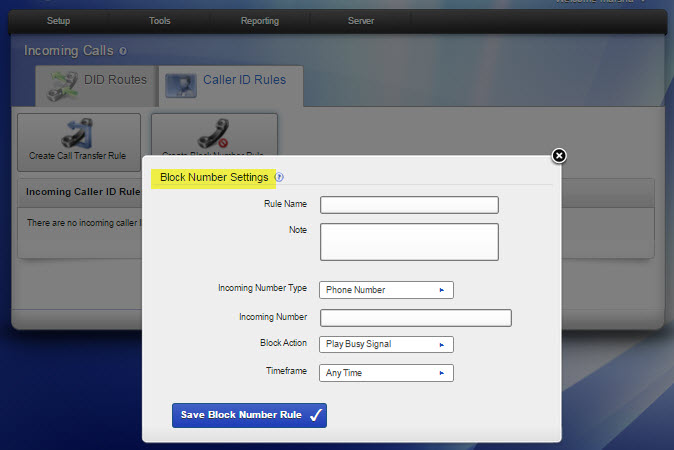
Enter/select the following:
- Rule Name to identify the rule.
- Note. Clarifying information regarding the rule.
- Incoming Number Type from the dropdown. Options are Phone Numer or Prefix.
- Incoming Number. Enter the phone number or prefix that you want to affect.
- Block Action. Enter the blocking actions from the dropdown options: Play Busy Signal, Play Congestions, or Hang Up.
- Timeframe. Select Any Time, During Business Hours, Outside Business Hours, or Weekends Only from the dropdown. (For more information, see “Time Frames.")
When finished, click Save Block Number Rule and a message is displayed indicating the new rule was successfully saved.
Modifying Caller ID Rules
To change an incoming call rule, modify the settings for the rule and click its Save button. The rule is saved and a message is displayed indicating the rule was successfully saved.
Deleting Caller ID Rules
To delete an incoming call rule, click its Delete button. The rule is deleted permanently and a message is displayed indicating the rule has been deleted
rel6.0