Sound Manager
The
Sound Manager lets you create, upload, modify, and delete all of the sounds in Switchvox other than Music On Hold. It also lets you organize your sounds in folders, and manage the same sounds that are in different languages. Sounds can be uploaded from your computer, or recorded over any phone that’s connected to Switchvox.
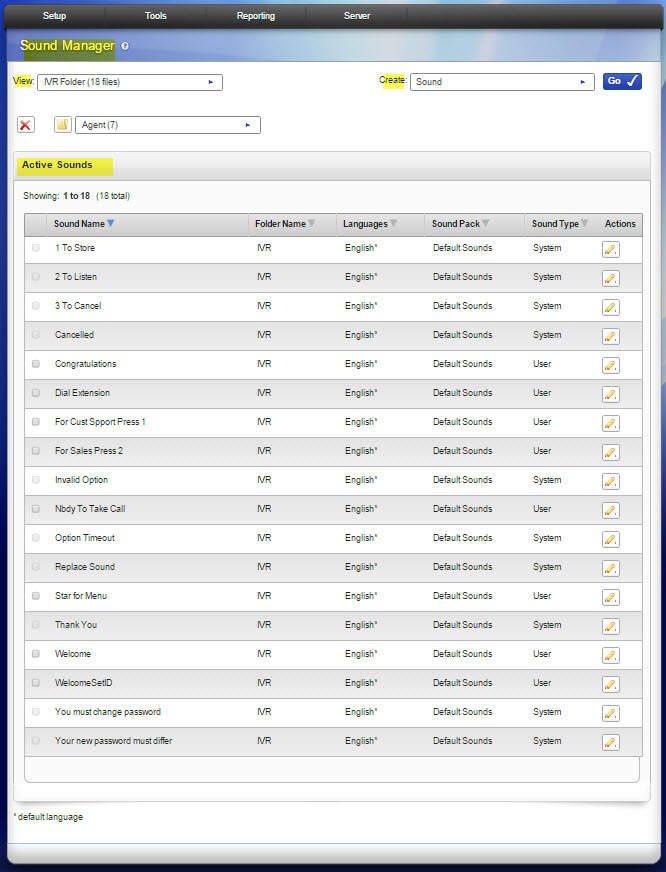
From the main
Sound Manager page you have
View and
Create options.
View offers several display options, which are shown in separate tables:
- All Sounds
- All Sound Packs,
- All Folders
- All Languages
- All sounds within a selected folder
Create allows you to add a new Sound, Sound Pack, Folder, or Language.
NOTE: You are not allowed to delete, move, or modify system sound information or system sound files in the English language.
Adding a Sound
To add a new sound, select
Sound from the
Create dropdown menu and click
Go.
This displays the Create Sound/Sound Information page. 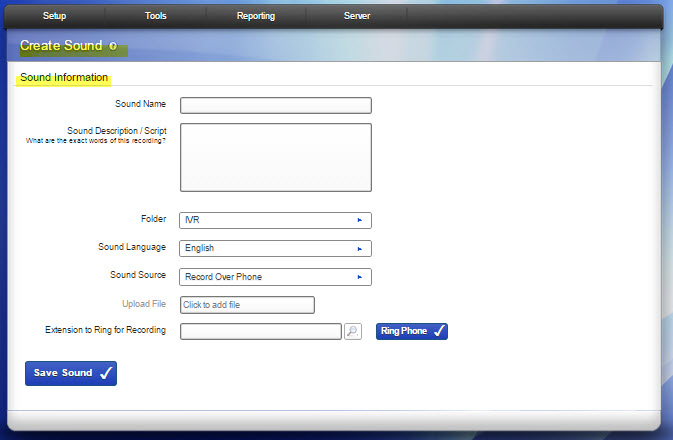
Supply the following information:
- Sound Name. Enter a unique name for this sound.
- Sound Description/Script. Enter the words of this recording. This is displayed when you mouse over the sound name in the list of sounds.
- Folder. Select a folder from the dropdown menu for this sound.
- Sound Language. Select the language that is used in this sound.
- Sound Source. Select either Record Over Phone or Upload File from the dropdown menu.
- If you chose Record Over Phone, enter the extension to ring, then click Ring Phone. Make your recording, then hang up the phone or press #. NOTE: due to the nature of the API, Record Over Phone will only ring the main extension, it will not follow extension call rules.
- If you chose Upload File, browse your computer to select and upload the sound file.
- NOTE: Only wav or gsm files are supported for sound.
When the settings are correct, click
Save Sound. (If you are uploading a file, the transfer begins). The system redisplays the Sound Manager page with a message that a new sound has been added, and the new sound is included in the list of sounds.
Modifying/Playing a Sound
Click a file’s
Modify/Play (pencil) icon to display the
Sound Info page that shows the sound’s Status, Language, Sound Information, and Actions allowed.
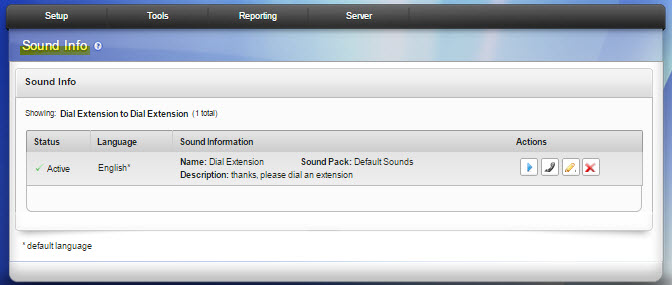 Play Sound Icon
. Plays the sound on your computer. You must have a sound player application installed to hear the sound. For sounds in the gsm format, Quicktime by Apple is a good player.
Play Sound To Phone Icon. Displays the
Find an Extension popup menu. Search
for and enter the extension to ring, then click Go. This rings the extension, then plays the message when you pick up the phone.
Modify Icon. Displays the
Sound Information details. Make your changes, then click Save Sound. The Sound Manager main page is displayed with a message indicating that the sound was modified. Supply or change the following fields:
- Sound Name. Change name if desired.
- Sound Description/Script. What are the exact words of this recording? Change the script or description.
- Folder. Cannot change here.
- Sound Language. Cannot change here.
- Sound Source. Select from the dropdown menu either Record Over Phone or Upload File.
- Upload File. If this was selected, click to display files on your hard drive.
- Extension to Ring for Recording. Search for and enter the extension if you selected Record Over Phone. Then click Ring Phone and make your recording, then hang up the phone or press #. NOTE: due to the nature of the API, Record Over Phone will only ring the main extension, it will not follow extension call rules.
WARNING: If you are uploading or re-recording the sound file, the existing file is replaced. You will not be able to retrieve the old version of the file.
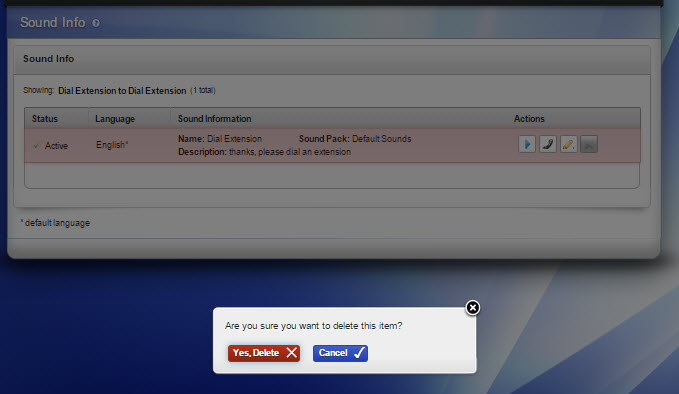
Deleting a Sound
In the sounds list on the main page, check the boxes for the sounds that you want to delete, then click the Delete icon (at the top of the song list). Be sure that you do indeed want to delete these sounds, then click
Yes, Delete. The main page is displayed again, with a message that the sound has been deleted.
NOTE: If a sound box cannot be checked, it is because it cannot be deleted. The basic set of system sounds cannot be deleted.
Moving a Sound into a Folder
In the sounds list, check the boxes that you want to move, select the folder the sound
belongs in (the dropdown menu), then click the Move Checked To icon. The Sound
Manager main page is displayed with a message that the sound has been moved. If
you have used the sound in IVRs or call queues, Switchvox now accesses the sound
from its new folder.
NOTE: If a sound box cannot be checked, it is because it cannot be moved. The basic set of system sounds cannot be moved.
About Sound Packs
Sound packs are pre-configured packages that you can add to Switchvo and use in
place of the pre-installed default English sound pack. Only officially certified sound
packs can be installed on Switchvox. To obtain sound packs for different languages,
go to Switchvox Product Addons.
To add a sound pack:
- Download the sound pack to your desktop computer.
- Go to Tools > Media > Sound Manager.
- Select Sound Pack from the Create dropdown.
- Click Go. This displays the Sound Pack Information page.
- Click the text box to locate the file on your computer.
- Click Upload Sound Pack.
The sound pack is added to the Sound Manager, and the language of the sound pack
is available for use.
Managing Folders
Sounds are organized in folders. Switchvox comes preconfigured with several folders, which cannot be deleted. Typically, the folder name indicates the type of sounds it contains. Any new folders should be named accordingly.
Adding a New Folder
To create a new folder, select
Folder from the
Create dropdown menu, then click
Go. Enter a unique
Folder Name and a
Description for this folder, then click
Save Sound Folder. This displays the Sound Manager main page with a message that a new folder has been created, and the new folder is included in the folders list.
Modifying a Folder
To modify a folder, click its Modify icon. Make your changes, then click
Save Sound Folder. The Sound Manager main page is displayed with a message that the folder has been modified.
Deleting a Folder
To delete a folder, select its Delete icon. Be sure that you do indeed want to delete this folder and all of the sounds in it, then click
Yes, Delete Folder. The folder and all sounds in it are permanently removed, and the Sound Manager page is displayed with
a message that the folder has been deleted.
Managing Languages
Switchvox supports multiple languages. Each sound in the Sound Manager can be uploaded or recorded in all the available languages. Your sounds ‘hi,’ ‘hola,’ and ‘ciao’ sounds are grouped together, because they say the same thing to the caller. The pre-configured default language is English, and there is a set of system files tagged English.
Adding a New Language
To add a new language, select Language from the
Create dropdown menu. Click
Go. This displays the
Language Information page. Enter the Language Name, then click Save Language. The Sound Manager main page is redisplayed with a message that a
new language has been added.
Modifying a Language
To modify a language, click its
Modify button. Make your changes, then click
Save Language. The Sound Manager main page is displayed, with a message that the language was modified.
Deleting a Language
To delete a language, click its Delete icon. Be sure that you do indeed want to delete this language and all of the sounds associated with it, then click
Yes, Delete Language. The Sound Manager main page is displayed with a message that the language was deleted.
Setting a Default Language
To set a language as the default language, click its
Default Language check box. The page is refreshed with a message that the sound pack was successfully activated. Now the sounds labeled with that language are played. If there is no sound available in that language, Switchvox uses the English system sound-file.
WARNING: Changing the Default Language automatically causes the Switchvox software to restart. All current phone connections will be dropped, and members will be logged out of all call queues.
Rel 6.0